Monday, August 30, 2010
These boots are made for walkin'
A picture says a thousand words, but a movie says...?
I'll get some photos with me wearing them for size reference, but enjoy this in the meantime. :)
Friday, August 27, 2010
Feet Progress
I don't have much to say. I've been blending some hair on my hackle, and preparing the boots. I'll let the photos tell the story.


This is my homemade hot wire cutter. I took a four D battery powered lamp and made my own PVC pipe handle and guitar string cutting wire. I cut the rigid foam to shape pretty easily. The fumes are toxic so you should have good ventilation.


Gorilla glue and duct tape!
To straighten the hair (it came kinked) I hung them in the shower and poured boiling water over them. It worked okay, but was time consuming and gross, so I ended up just blow drying instead.

After blending strawberry blond and dark brown together, I started latch hooking to the boot.

It's ok so far. Looks off, but maybe it will be better when all the hair is on.
I'm on the fence about the toenails as well. Hmm...

Friday, August 20, 2010
Hackle!
I was watching "How it's Made" the other day and the episode was about wig making.
Here is the link:
Wig ! Watch it to get an idea about what the rest of this entry is all about. It's weird though, the version I recorded on my DVR has a guy narrating. Jump to minute 2 for the hackle.
I knew I was going to need to blend some of my Kanekalon hair that I ordered from I Kick Shins, so after watching that, I knew I wanted a hackle and drawing card.

Here is a dealer I found, and most other dealers were all within $5 of each other. $70 for a hackle, and $50 for a Hair Drawing Card set.


Wow, pricey.
No thanks!
However they looked simple enough that I bet I could make one without too much trouble. So before I started I remembered a tutorial I came across while researching Chewbacca for a hackle.
Sweet!
I basically followed that tutorial with the exception that I used my favorite Gorilla Glue to hold the nails in.

This was my result, and it works great so far.

For the hair drawing card, I took some thick scraps of leather and my trusty stanley stapler and went to town. I stapled the leather directly to some rigid pink insulation foam board, then yanked it off when I was done.
It holds the hair better than I thought it was going to. hehe.

Wednesday, August 18, 2010
Chewie vs. Mastercard
After my wife and I sat down and reviewed our finances, it was pretty obvious our spending was exceeding our budget. It doesn't mean this project is on hold, but it does mean that I am really close to running out of money hehe. So I am doing my best to research materials and methods that will eliminate unnecessary costs, while still having a little cushion for "mistakes" and reordering. I've had to do this twice already, and hopefully there won't be too many more.
The good news is that I am 80% finished with my chewbacca clay master:
The good news is that I am 80% finished with my chewbacca clay master:
Click to enlarge


I'm using Klean Klay, which is a non hardening clay. It's probably way to soft for this, but its what I had.
Monday, August 16, 2010
Bandoleer
The bandolier (or bandoleer) was pretty straight forward. I had worked with leather before when I had made a pair of authentic 14th century shoes and kidney pouch, so this wasn't going to be too troublesome. The only problem I had was the type of leather. I had a huge box of leather scraps that I wanted to use, because I am trying to keep my costs reasonable.
For the measurements, I created the silver boxes and layed them out in a line, as they would rest on the leather belt. Not much math involved, so I hope I don't get it wrong hehe.
The bag was made from the same thicker ounce leather, even though Chewie's bag looks to be of a lighter weight leather. I used what I had. I created a pattern with bristol board and started cutting.
This is a plaster mold I used to form the silicone mold:

The current boxes on the bandoleer do not a have post in them, they are completely hollow-cast.
Originally I thought the leather strap would hold...It won't.
Then I thought hot glue would hold...It doesn't work very well.
So I had to go back and modify the mold to put in posts so I can rivet the boxes to the leather.
So now I have to decide if I want to cast 19 more boxes and paint them all again. Ugh. More costs.
Until I do that (and I probably will, because it is a better design) I am thinking about using some remaining resin I have left over and using a clay damn to cast some ghetto posts in the boxes I have.
I tried it on one box that fell out. The good news is that it works. The bad news is that the hot glue strips all the silver metallic paint from the resin box. Grrr.

Below you can see the very last block on the top has paint stripped by the hot glue.

This is a close up of the concho and snap that hold the bag to the bandolier. The concho is temporary until I can find an authentic one.

Authentic concho. It looks like a heraldic lion of some type.


I stitched the bag in one day. It was a really simple design and I am pleased that I had enough large pieces of scrap leather to complete it.

Oh yeah, I made a blaster, but have no photos of the creation progress...but I created it following this tutorial:

Friday, August 13, 2010
Chewie Feet
Chewbacca is a tall guy, and I'm a tall guy, so it only seemed natural that I could "jump into his shoes". But first I need a little lift.
According to the official Star Wars website, Chewie is 2.28 meters talls. I am 2 meters tall. I need .28 meters or 11 inches to reach that height. I know that the actor that played Chewie (Peter Mayhew) has been quoted saying he was 7'9" in his costume, but I am not trying to be as tall as him in costume, I want to be as tall as Chewie. So 7'4" to 7'5" will get me in the ballpark.
Seven inches through lifts, three or four inches with mask height (Chewie has a tall head) should get me to 7'4".
So how to I add 7" to my 6'6" frame?
Stilts were the first thing that popped into my head, and what better stilts to use than Skywalker Stilts!
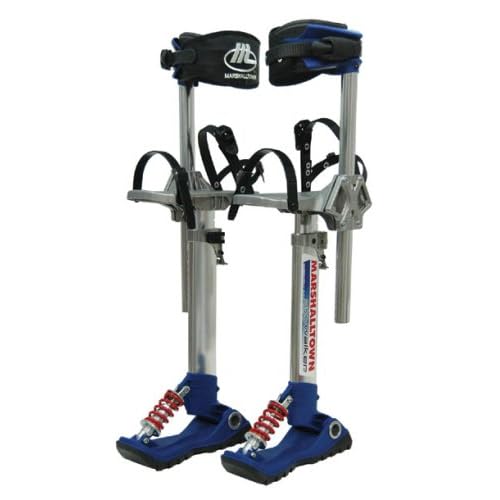
These things are awesome, but with an equally awesome price tag. The have cool articulating feet and seem to be the premiere drywall stilts around. But...they're too tall for me. It would make me freakishly tall (8 feet) and when someone's legs get really long, thier arms start looking really short. It looks awful.
So these stilts are out. Bummer, it would have been fun though.
This pink insulation foam is real handy for random projects and it's not too expensive for a huge 8'x2" sheet.
What to do... what to do...
Walking with big feet stiff feet...unnatural. So what about a foot that bends?
At first I was thinking about putting a hinge on the toe, but the more involved it became, the more it started being impractical. Then I found some stuff called FlexFoam-iT! and instead of a paint can or pink foam, I got these boots:
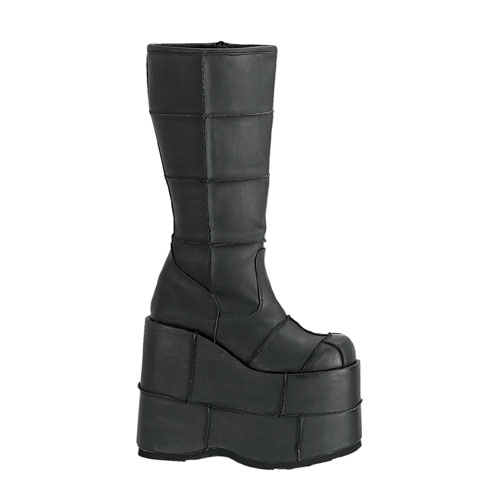
7" platform and they fit great. When I put them on I spontaneously danced the YMCA and sang KISS songs.
Time to make some toes:

You can see the pink foam in the background that I used as a support underneath the clay.

The toes were a little long, so I shortened them by 1.5" before getting ready to mold.
Once I had the shape to my satisfaction, I pulled it off the shoe and cast it in plaster:

Here is my first attempt, call it a 'test pull'.


Squishy!

I ran out of foam from my trial kit, so I need to wait on more before I finish the other foot. I hope to have them glued to the boot soon!
Thursday, August 12, 2010
Playing with Plaster
Through my research I found that best way to start a chewie mask was to sculpt it directly to my facial contours in order to fit perfectly. So I needed a life-cast of my head. Not something I could do by myself, and my wife rarely has time to help because she is so busy with work. Fortunately we had a vacation coming up. :) With the help of my wife and her cousin, we did a life-cast of my face on the hotel room floor.
This is the basic process:http://www.rebellegion.com/forum/viewtopic.php?t=18217
I wish I could say my process was as seamless as it seems in the tutorial, but alas, it was not.
My mold broke and I couldn't make another life-cast because the vacation was over. So I ended up sculpting my head by looking in a mirror.


Wednesday, August 11, 2010
First Step: Bowcaster
After a bit of research, I found out this blaster is not very common, so finding examples was hard.
I'm not going to make a list of parts (if you want a list, just ask) but instead just show you what I did.
I worked only from photos and by a few (2) good examples of fan made bowcasters (from photos). The Photos are from the web and from the HD DVD screen captures.

Pattern applied to a simple piece of pine from Home Depot.

I blew this image up to a life size crossbow stock and printed it out.


End product:

An original Single Point Scope:

And the one I made:

Subscribe to:
Posts (Atom)